Most DBMS will report transaction conflicts if concurrent transactions attempt to update the same data (since this is the classic "lost update" fault). Certainly it is a necessary condition for transaction serialisation that such attempts are prevented.
There has recently been some discussion in the community about whether transaction conflicts should also be reported when data that has been read in the transaction has been changed before the transaction commits. In combination with the above condition, this is sufficient to ensure transaction serialisation (so-called view serialisability).
For over ten years, Pyrrho has enforced this very strong requirement (it is the only transaction mode it supports) although for practical reasons the full read set of a transaction is not always available, and Pyrrho will report a transaction conflict in all cases of doubt.
From today, Pyrrho provides some additional information in the standard SQL diagnostics area to identify a reason that a transaction conflict has been reported, provisionally using the keyword WITH. Because of Pyrrho's role-based data models, transactions do not necessarily agree on table names etc, and database objects in such messages are usually identified by their numerical identities.
Tuesday, 15 March 2016


Saturday, 5 March 2016
Threading and PyrrhoLink
The thread-safety issues when database connections are
shared among threads have been well-documented for years, and as threading
becomes more widespread a number of famous libraries have been affected. While
it is good practice to close database connections as soon as possible, an
application can have many database connections open, and connections can be
shared across threads.
The following considerations are planned for the
PyrrhoLink/OSPLink implementations in C# and Python from version 5.4. They
provide some protection from unsafe coding, and operations will only block
while the connection is busy in another thread.
ADO.Net
Many complications involving ADO.NET such as
DependentTransactions are irrelevant in Pyrrho because of strong transaction
isolation and serialisation.
1.
We need to enforce only one ongoing transaction
per connection. The situation is really likely only to arise if the connection
is shared between threads, so a call to BeginTransaction should block until the
connection is available. If it is the same thread it is probably a programmer
mistake (nested or parallel transactions are not supported) and an exception
should be raised.
2.
We need to enforce only one open reader per
connection. In the single threaded case (or on the same thread), this likely to
be a misunderstanding by the programmer (ADO.NET allows only one active reader
per connection), and an exception should be raised. Otherwise, the call should
block until the connection is available.
3.
We should definitely disallow the sharing of
commands between threads because IDbCommand methods can set up the command
text, parameters etc and it is easy to see that conflicts could arise. Each IDbCommand
should be specific to a given thread, but a connection can have many commands.
4.
When a command is executed, the call should
block until the connection is available, as the connection might be busy in
another thread.
5.
We should disallow the sharing of readers
between threads, because of possible races with Read(), data fetching, and
RdrClose(). We will associate each reader with the command’s thread, and cross-thread
access should raise an exception.
Python
Similar blocking and safety measures will be added to the
Python library OSPLink.
Act() and Versioned objects
At first sight, connection.Act(s) looks atomic and
thread-safe, but the changes it makes could interfere with open Readers in the
same connection. So its internal use of Command execution should make it comply
with the same protocol.
Versioned objects do not use Command, but need to be subject
to the same restrictions about the Connection being used. It is okay to use a
versioned object in another Connection, but if that connection is busy in
another thread, an operation such as Update or Delete will block until the
connection is available. Versioned objects can easily be used in client-side
cursor simulations.
REST
The REST API is unaffected by all the above because each
call is effectively in a new Connection.
Comments from the community are welcome.
Comments from the community are welcome.
Tuesday, 15 September 2015
A Python API for Pyrrho
As of today, OSPLink.py
is available in the distribution and enables the open-source Pyrrho server
OSPSvr to be accessed from Python 3.4 clients. The API has similarities to
Pyrrho’s version of ADO.NET.
To use OSPLink.py, place it in the same folder as your Python script.
(Update 30 Sept 2015: OSPLink.py now includes Python implementations of the AWebSvr classes from TAWQT.com and does not depend on .NET. There is a tutorial on the PyrrhoDB website containing a fully-worked-out sample.)
For example (assuming OSPSvr.exe is running on the local machine):
conn.open()
try:
conn.act("create table a(b date)")
except DatabaseError as e:
print(e.message)
conn.act("insert into a values(current_date)")
com = conn.createCommand()
com.commandText = 'select * from a'
rdr = com.executeReader()
while rdr.read():
print(rdr.val(0))
rdr.close()
print("Done")
For full details, see section 6.8 of the PyrrhoDB Manual.
To use OSPLink.py, place it in the same folder as your Python script.
(Update 30 Sept 2015: OSPLink.py now includes Python implementations of the AWebSvr classes from TAWQT.com and does not depend on .NET. There is a tutorial on the PyrrhoDB website containing a fully-worked-out sample.)
For example (assuming OSPSvr.exe is running on the local machine):
from OSPLink import *
conn = PyrrhoConnect("Files=Temp;User=Fred")conn.open()
try:
conn.act("create table a(b date)")
except DatabaseError as e:
print(e.message)
conn.act("insert into a values(current_date)")
com = conn.createCommand()
com.commandText = 'select * from a'
rdr = com.executeReader()
while rdr.read():
print(rdr.val(0))
rdr.close()
print("Done")
For full details, see section 6.8 of the PyrrhoDB Manual.
Monday, 10 August 2015
AngularJS and avoiding Entity Frameworks
Following the series of posts about ASP.NET and REST in this blog during May, I would now like to advertise a quite different approach, developed on www.tawqt.com .
The idea is that with the trend towards server virtualisation, it is becoming much more attractive to build systems where each web application has its own custom web server, instead of sharing web server such as IIS or even Apache. At the same time, an embedded database system is often more efficient that a client-server database.
Tawqt.com provides a basic tutorial revisiting a simple Web application from one of the AngularJS tutorials. And Pyrrho of course has its own version.
Tawqt.com's framework also brings a number of improvements over ASP.NET, by making all views cacheable and using AJAX for dynamic content, using JSON objects instead of HTML in the API. The obvious next step is then to use JSON objects in the database too, as MongoDB does, and of course Pyrrho now supports that too.
So, we also have a Pyrrho-Document version of the same Angular tutorial! I look forward to comments...
The idea is that with the trend towards server virtualisation, it is becoming much more attractive to build systems where each web application has its own custom web server, instead of sharing web server such as IIS or even Apache. At the same time, an embedded database system is often more efficient that a client-server database.
Tawqt.com provides a basic tutorial revisiting a simple Web application from one of the AngularJS tutorials. And Pyrrho of course has its own version.
Tawqt.com's framework also brings a number of improvements over ASP.NET, by making all views cacheable and using AJAX for dynamic content, using JSON objects instead of HTML in the API. The obvious next step is then to use JSON objects in the database too, as MongoDB does, and of course Pyrrho now supports that too.
So, we also have a Pyrrho-Document version of the same Angular tutorial! I look forward to comments...
Tuesday, 26 May 2015
ASP.NET with a REST API: Part 1
Pyrrho's new REST API works well with ASP.NET. This sample was originally
implemented using LocalDB/SQL Server and the Entity Framework. Pyrrho has some
features that are much easier to use, as this sample shows.
Visual Studio uses its own IIS, and for this sample the Pyrrho server needs to be running, with its HTTP service and Pyrrho service. It is not a simple matter to copy or deploy ASP.NET applications, and there are several web sites that discuss how to do so. To make it easier to deploy, you could use EmbeddedPyrrho and the real IIS from the start, but then you have to add more configuration steps during development.
We are still using SQL Server for the ASP.NET account control. You may find yourself accessing the DefaultConnection (Haikus) through Visual Studio’s Server Explorer to remove entries from AspNetUsers.
We will not use the Entity Framework. In my arrogant opinion, client side DataSets and data models are really bad for any form of concurrency and transaction management, and in this respect are a serious error in both the Microsoft and Java world. Instead I invite readers to examine direct use of an database Connection as in step 10 below, to Post (step 12) a strongly-typed class whose structure has been obtained from the DBMS. There are Get, Put and Delete too of course, and this sample will show their use. Put is in step 20, and Get and Delete will be in the next part of this posting. Post automatically supplies any missing components for a new primary key. We will use BLOBs for icons and author pictures.
Visual Studio uses its own IIS, and for this sample the Pyrrho server needs to be running, with its HTTP service and Pyrrho service. It is not a simple matter to copy or deploy ASP.NET applications, and there are several web sites that discuss how to do so. To make it easier to deploy, you could use EmbeddedPyrrho and the real IIS from the start, but then you have to add more configuration steps during development.
We are still using SQL Server for the ASP.NET account control. You may find yourself accessing the DefaultConnection (Haikus) through Visual Studio’s Server Explorer to remove entries from AspNetUsers.
We will not use the Entity Framework. In my arrogant opinion, client side DataSets and data models are really bad for any form of concurrency and transaction management, and in this respect are a serious error in both the Microsoft and Java world. Instead I invite readers to examine direct use of an database Connection as in step 10 below, to Post (step 12) a strongly-typed class whose structure has been obtained from the DBMS. There are Get, Put and Delete too of course, and this sample will show their use. Put is in step 20, and Get and Delete will be in the next part of this posting. Post automatically supplies any missing components for a new primary key. We will use BLOBs for icons and author pictures.
1. Start up VS Express 2013 as administrator,
and from the start Page, select New project. Make sure Visual C# and Web is
selected. Give the Name as Haikus, and make sure the location is somewhere suitable such as C:\Temp.Click OK.

2. Select
MVC, and keep the the other defaults. Click OK
3. After a few minutes, you get an empty project. Try Run. A browser starts up to
access your MVC app running on your local machine. This is the default MVC 5
application. It has many features, but don’t touch them just now. Close the browser window.
Build the underlying database
5. Make sure the Pyrrho server OSP.exe is running, we assume on localhost with the default port 5433.
From a command prompt, start up the PyrrhoCmd utility for
the database haikus: PyrrhoCmd haikus
and enter the commands shown to create the database tables we will use.
The square brackets here help with line
wraparound.
[create
table author(id char primary key,name char,pic blob)]
[create
table verse(id int primary key,ownr char references author,cont char)]
[create table tag(id int primary key,name
char)]
[create
table rating(vid int references verse,uid char references author,score int)]
[create
table tagging(tid int references tag,vid int references verse)]
[create
table comment(id int primary key,vid int references verse,aid char references
author, cont char)]
[create
table likes(vid int references verse,uid char references author)]
6. Still at the SQL prompt, use
the command: table “Role$Class”, to get class definitions for our application.

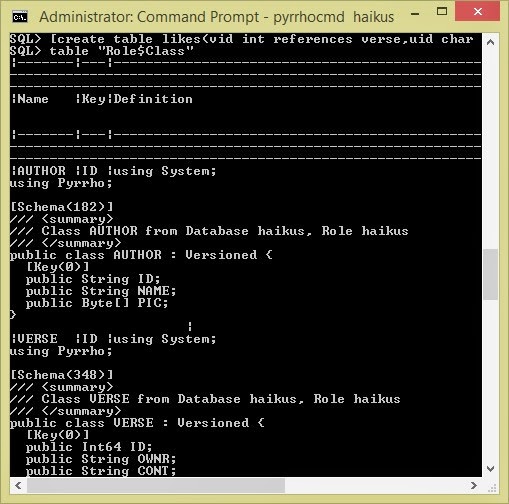
“Your
mileage may vary”: the Schema keys may be different for you. They are used in
Pyrrho’s REST API to check that the class definition remains valid in the
database and role.
In the command prompt, right click and Select All, then Enter to copy the text to the clipboard, and paste it into a notepad.
We will use each of the class definitions to
define classes AUTHOR, VERSE etc. in the next step.In the command prompt, right click and Select All, then Enter to copy the text to the clipboard, and paste it into a notepad.
7. Back
in Visual Studio, in Solution Explorer, right-click References, Add Reference.. and Browse.. to add OSPLink.dll from the Pyrrho distribution. Click Add.
8. In Solution Explorer, right-click Models select Add/New Item../Visual C#/Code/Class, change the Name to AUTHOR.cs and click Add.
8. In Solution Explorer, right-click Models select Add/New Item../Visual C#/Code/Class, change the Name to AUTHOR.cs and click Add.
9. In the AUTHOR class, paste in the
class definition from AUTHOR that you obtained in step 6.
 Similarly add Model classes to your
project for VERSE, TAG, RATING, TAGGING, COMMENT and LIKES. Click the Save All icon in Visual Studio.
Similarly add Model classes to your
project for VERSE, TAG, RATING, TAGGING, COMMENT and LIKES. Click the Save All icon in Visual Studio.

10. Add
another Models class called Connect and edit it to look like this.
using System;namespace Haikus.Models{using Pyrrho;public class Connect{public static PyrrhoConnect conn;internal Connect(){conn = new PyrrhoConnect("Files=haikus");conn.Open();}}}
11. Open
the Startup.cs file and add a call to make the connection to the database as
shown
12. Now let’s start wiring this up. Any time that a user registers a new account, we want to record them in the Author table.
public partial class Startup
{
public void Configuration(IAppBuilder app)
{
new Models.Connect();
ConfigureAuth(app);
}
}12. Now let’s start wiring this up. Any time that a user registers a new account, we want to record them in the Author table.
internal static AUTHOR Find(string us){var au = Connect.conn.FindOne<AUTHOR>(us);if (au != null)return au;au = new AUTHOR { ID = us };Connect.conn.Post(au);return au;}
13. In Solution Explorer, double-click
Controllers>AccountController.cs. Use the drop-down boxes to find the
Register(RegisterViewModel model) method and add the line AUTHOR.Find(..) shown.
[HttpPost][AllowAnonymous][ValidateAntiForgeryToken]public async Task<ActionResult> Register(RegisterViewModel model){if (ModelState.IsValid){ var user = new ApplicationUser() { UserName = model.Email, Email = model.Email };IdentityResult result = await UserManager.CreateAsync(user, model.Password);if (result.Succeeded){await SignInAsync(user, isPersistent: false);// For more information on how to enable account …..// ...AUTHOR.Find(user.UserName);return RedirectToAction("Index", "Home");}else{AddErrors(result);}}// If we got this far, something failed, redisplay formreturn View(model);}
14. Before we run the program, in Solution Explorer, left-click the project. In the Properties pane, ensure that
WindowsAuthentication is Disabled and AnonymousAuthentication is Enabled.
 15. When
you are returned to the home page, verify that you have a welcome message for
your new user. Close the browser. In the command prompt we had
before, do “table author” to see that fred got defined by the code we added.
15. When
you are returned to the home page, verify that you have a welcome message for
your new user. Close the browser. In the command prompt we had
before, do “table author” to see that fred got defined by the code we added.
Add the following code two closing braces in
from the end of AccountController:
Run the program, and register a
user called fred@abc.com with password Pa$$w0rd.
Click Register and close the browser.
Author Profule Pictures
16. Let’s show pictures for logged-in users. We’ll add a URL for this in the AccountController. We’ll create a default image to use if the user hasn’t given a picture. In AccountController.cs add using System.Drawing; and using System.IO; Add this code two closing braces before the end of AccountController.cs:17. Now replace the Hello greeting with the user's picture:[AllowAnonymous]public ActionResult Picture(string id){var au = AUTHOR.Find(id);var b = au.PIC;if (b==null){var im = new Bitmap(24, 24);using (var g = Graphics.FromImage(im)){g.FillRectangle(Brushes.White, new Rectangle(0, 0, 24, 24));g.DrawEllipse(Pens.Black, new Rectangle(6, 6, 12, 12));g.DrawLine(Pens.Black, 2, 22, 7, 17);g.DrawLine(Pens.Black, 22, 22, 17, 17);}var ms = new MemoryStream();im.Save(ms, System.Drawing.Imaging.ImageFormat.Jpeg);b = ms.ToArray();}return File(b, "image/jpg");}
18. Now let’s start to provide a way for authors to add their profile picture. In Views/Manage/Index.cshtml add the following code somewhere sensible:@using Microsoft.AspNet.Identity@if (Request.IsAuthenticated){using (Html.BeginForm("LogOff", "Account", FormMethod.Post, new { id = "logoutForm", @class = "navbar-right" })){var id = User.Identity.Name;@Html.AntiForgeryToken()<ul class="nav navbar-nav navbar-right"><li><a href="@Url.Action("Index","Manage")"> <img title="@id" alt="@id" src="@("/Account/Picture/'" + id + "'/")" /> @id</a></li>
19. We need to handle the postback.<legend>Choose a profile picture:</legend>@using (Html.BeginForm("Profile", "Account", FormMethod.Post, new { enctype = "multipart/form-data" })){<input type="file" name="file" /><input type="submit" value="Upload Picture" />}
// This action handles the form POST and the upload///
/// A user has just updated their profile picture///
///
///
[HttpPost]
public new ActionResult Profile(HttpPostedFileBase file)
{
var del = new System.Drawing.Image.GetThumbnailImageAbort(dummy);
IntPtr p = new IntPtr();
// Verify that the user selected a file
if (file != null && file.ContentLength > 0)
{
var sr = file.InputStream;
var im = System.Drawing.Image.FromStream(sr);
if (im.Width>24 || im.Height>24)
im = im.GetThumbnailImage(24, 24, del, p);
var ms = new MemoryStream();
im.Save(ms,System.Drawing.Imaging.ImageFormat.Jpeg);
Haikus.Models.AUTHOR.SetPicture(User.Identity.Name,ms.ToArray());
}
// redirect back to the index action to show the
form once again
return RedirectToAction("../Home/Index");
}
// Kludge for GetThumbnail
bool dummy()
{
return false;
}20. Finally define the SetPicture method in the AUTHOR.cs class: Next steps - in Part 2: Editing Haikus, Likes and Comments.internal static void SetPicture(string user, byte[] pic){var au = Find(user);au.PIC = pic;Connect.conn.Put(au);}
Subscribe to:
Posts (Atom)